
XP DEUS 2 Common Settings: How to Change Them
Learn the settings you will use most on the XP DEUS II, what they do, and how to adjust them for parks, fields, iron-heavy sites, and saltwater beaches.
The DEUS II gives you a lot of control, but you do not need to change everything to start finding targets. Choose a factory program that suits the site, get the detector running smoothly, and adjust one setting at a time. This guide follows the DEUS II remote-control manual and explains the most useful adjustments in plain language.
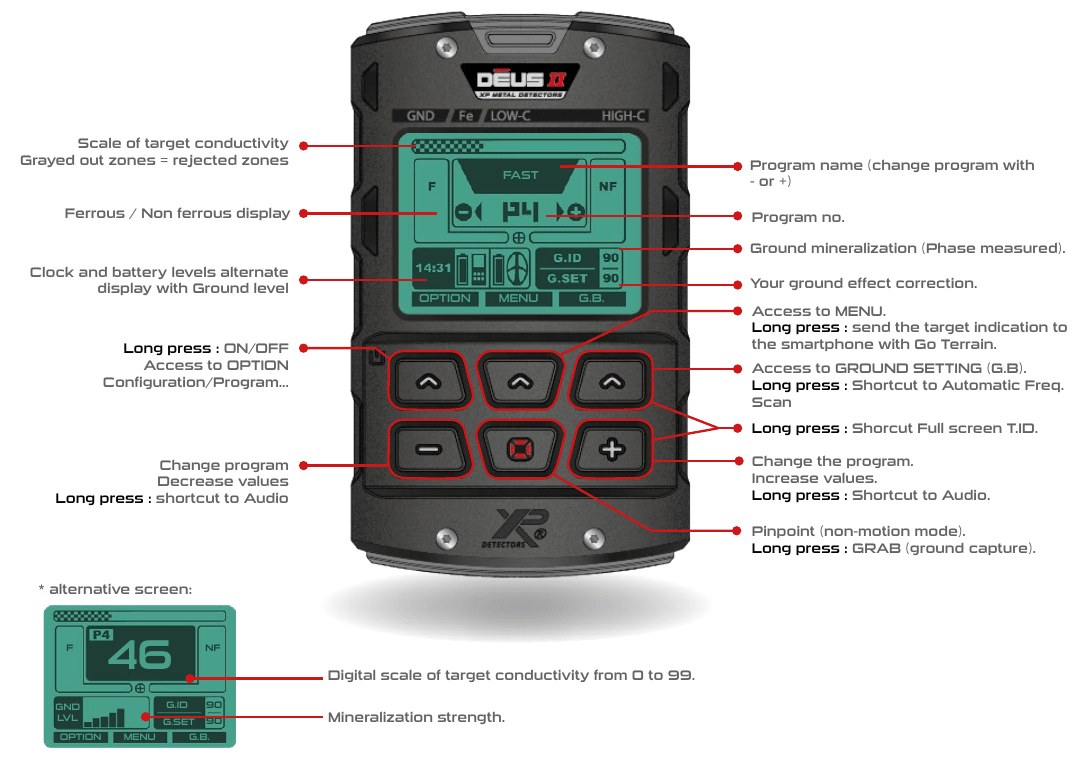
DEUS II Button Layout and Display
The three upper buttons follow the labels along the bottom of the screen. On the main detecting screen, those labels are OPTION, MENU, and G.B. When you enter a menu, the labels change to show actions such as SELECT, EXPERT, scrolling, or returning.

Basic Button Guide
Upper-left button: Press to open OPTION. Press and hold to turn the remote on or off.
Upper-center button: Opens MENU for the main detection settings.
Upper-right button: Opens G.B. for ground settings. From the main screen, a long press provides a shortcut to automatic frequency scan.
Minus and plus: Change programs on the main screen and change the selected value inside menus. Hold either for approximately two seconds on the home screen to open the audio shortcut.
Bottom-center target button: A short press opens Pinpoint. Holding it while pumping the coil performs a ground GRAB.
T.ID is the target identification number. G.ID is the measured ground mineralization value, while G.SET is your current ground setting. The mineralization strength indicator shows how strongly the ground is affecting the detector. Grayed-out areas of the target scale represent rejected zones. Target IDs are clues, so listen to the sound and check the response from another direction before deciding whether to dig.
Choosing the Right Factory Program
Use minus or plus on the main screen to select a program. DEUS II has 12 factory programs. Eleven use FMF simultaneous multi-frequency processing; program 7, DEUS MONO, uses a single frequency. The programs also use different signal processing, so matching the visible settings does not necessarily make two programs behave identically.
1. GENERAL
A versatile starting point for beginners and experienced users. Its conductive-soil subtraction helps reduce responses associated with damp ground.
2. SENSITIVE / 3. SENSI FT
Useful for small targets and mineralized or iron-contaminated sites. SENSI FT uses Full Tones and higher factory reactivity, providing more detailed audio to learn.
4. FAST
Designed for working among iron and mineralization. Its factory combination of Pitch audio, Square audio type, and reactivity 3 helps separate closely spaced responses.
5. PARK
A convenient starting point for recreational areas and modern trash. It includes a 23-35 notch and B.Caps at 2. That notch can also silence desirable targets in the same range.
6. DEEP HC / 7. DEUS MONO
DEEP HC emphasizes high-conductive targets with lower-frequency processing. DEUS MONO offers single-frequency operation and can help when severe interference makes FMF difficult to use.
8. GOLD FIELD / 9. RELIC
Specialist all-metal programs for mineralized gold-bearing ground or deep, larger targets. Accurate and regular ground GRAB adjustments are especially important.
10. DIVING
The most stable of the three saltwater programs, with less emphasis on very small low-conductive targets. For freshwater detecting, the manual favors an inland program.
11. BEACH / 12. BEACH SENS
BEACH balances wet-sand performance and sensitivity to small targets. BEACH SENS increases sensitivity to the smallest targets and may require more careful tuning and coil control.
How to Open the Main Settings Menu
Press MENU, use the on-screen scroll control to find a setting, and adjust it with minus or plus. Select EXPERT where offered for additional controls. Use the on-screen return arrow to leave the menu.
1. Sensitivity
What it does: Adjusts the detector's overall sensitivity from 0 to 99. Increasing it can help weak responses, but too much can produce distracting chatter from interference and difficult conditions.
When to adjust it: Lower it when the detector remains unstable after a frequency scan, particularly around power lines, electrical equipment, or other detectors.

How to change it: Open MENU, scroll to SENSITIVITY, and adjust with minus or plus.
Recommended starting point: The manual identifies 70-90 as a commonly used range. Start within that range and tune for stability at the actual site. The 93 shown in the illustration is a screen example, not a universal recommendation.
2. Frequency and Frequency Max
What it does: In FMF programs, FREQ. MAX controls the upper frequency limit of the multi-frequency range. It does not turn an FMF program into a single-frequency program. With the standard FMF coils, the manual lists upper limits of 14, 24, and 40 kHz. HF2 coil options are different: 29, 53, and 89 kHz.

How to change it: In an FMF program, open MENU, select FREQ. MAX, and use minus or plus to choose an available limit. In program 7, DEUS MONO, select FREQUENCY to change the single operating frequency.
Recommended starting point: Keep your chosen program's factory frequency setup while learning it. A lower upper limit may reduce responses to tiny low-conductive targets; a higher upper limit can help small-target sensitivity. Available choices depend on the coil and software.
3. Frequency Scan / Noise Reduction
What it does: Finds a quieter operating channel when electromagnetic interference is causing chatter.
How to run it: From the main screen, hold the G.B. button to start the automatic frequency-scan shortcut. You can also go to the frequency setting, select SHIFT, and then SCAN. SHIFT also allows manual channel adjustment with minus or plus.
Automatic scanning: Go to OPTION > SETTINGS > FREQ. SCAN and choose AUTO to scan when changing programs or the main frequency in DEUS MONO.
Tip: Try a scan before reducing general sensitivity. A scan addresses electrical interference; ground balance and Salt Sens address different sources of noise.
4. Discrimination
What it does: Sets a conductivity threshold for rejecting low-reading targets. The manual gives a range of -6.4 to 99, or 0 to 99 in the beach programs. Audio behavior also depends on the selected tone mode.
How to change it: Open MENU, select DISCRI, and adjust with minus or plus.
Recommended starting point: Begin with the factory setting. Raising discrimination to remove more trash can also remove jewelry, small coins, and other desirable targets. In Full Tones, discrimination acts as a tone break and Iron Volume controls the sound below it.
Gold Field and Relic: Programs 8 and 9 use IAR discrimination instead. It rejects ferrous responses according to signal amplitude and distance. Higher rejection can work against deep gold or relics that sound iron-like in mineralized ground.
5. Reactivity / Recovery Speed
What it does: Controls how quickly DEUS II separates nearby target responses. Lower reactivity can favor depth in clean ground; higher reactivity helps when iron or mineralization masks a good target.

How to change it: Open MENU, scroll to REACTIVITY, and adjust with minus or plus.
| Ground Conditions | Manual's Suggested Range |
|---|---|
| Clean ground, larger targets or coins with little iron | 0-1 |
| General detecting with limited iron contamination | 2-2.5 |
| Iron-heavy and/or mineralized ground | 3-5 |
Tip: Higher reactivity produces shorter sounds. Do not judge the setting by an air test alone: in difficult ground, better separation can reveal targets that a slower setting misses.
6. Iron Volume
What it does: Adjusts the low-tone volume, normally associated with targets below the discrimination setting. In this manual, the range is 0-10: 0 silences it and 10 is the maximum.
How to change it: Open MENU, select IRON VOLUME, and use minus or plus. The corresponding low-tone volume can also be adjusted in the Expert tone screen.
Recommended starting point: Keep some iron sound while learning a site so you can hear where contamination increases. Reduce it for comfort without assuming that silent iron is no longer affecting target separation.
7. Bottle Cap Rejection (B.Caps)
What it does: Helps classify rusty steel bottle caps and certain difficult iron objects as ferrous. Its range is 0-5, and the manual excludes programs 7, 8, and 9.
How to change it: Open MENU > DISCRI > EXPERT, find B.CAPS, and adjust with minus or plus.
Recommended starting point: Use the selected program's default, then increase only as needed when rusty caps are a recurring problem. PARK starts at 2. Reclassified caps can still be audible if Iron Volume is turned up.
8. Silencer
What it does: Filters residual high-tone spikes from difficult iron. This manual lists values from -3 to 7. More filtering can also hide good targets close to iron.
How to change it: Open MENU, find SILENCER, and adjust with minus or plus.
Recommended starting point: Keep the factory value while learning the audio. The manual describes 0-3 as a compromise, negative values as more revealing but noisier around iron, and 4-7 as stronger ferrous filtering.
9. Audio Response
What it does: Makes faint, deep-target sounds louder. The range is 0-7. It changes the sound curve; it does not increase detection depth.
How to change it: Open MENU, select AUDIO RESP., and use minus or plus.
Recommended starting point: Start with the factory setting. Increase if weak targets are hard to hear, but reduce it if tiny false signals become distracting or every target sounds equally close.
Ground Balance: How to Use GRAB
Ground balance helps DEUS II account for mineralization. The manual recommends GRAB as a quick, accurate method. This is especially important in GOLD FIELD and RELIC.

Automatic Ground GRAB
- Find a patch of ground without a metal target.
- Hold the bottom-center target/Pinpoint button.
- While holding it, pump the coil over the ground through approximately 15 cm (6 inches) of vertical movement.
- Continue until the ground response reduces and the displayed value stabilizes, then release.
Remember: A short press opens Pinpoint. The ground capture requires a hold while pumping the coil.
Ground Stabilizer
What it does: Adjusts the amount of ground feedback in applicable inland programs. 1 allows the most ground response, 2 provides more rejection, and 3 is more stable.
How to change it: Press G.B., scroll to GND STABILIZER, and adjust with minus or plus.
Recommended starting point: Keep the factory setting and perform GRAB first. Level 1 is an advanced choice for interpreting difficult, deep responses; it also lets more ground and coil-shock signals through. DEUS MONO does not offer this menu, and GOLD FIELD/RELIC use their own ground behavior.
Tracking and Manual Ground Balance
Tracking: In G.B., select TRACKING when you want the detector to follow relatively uniform ground that changes gradually. The manual prefers GRAB where a site contains rapid changes in mineralization, such as old settlement ground.
Manual: In this manual, manual ground adjustment is available in DEUS MONO only. Pump over clean ground, read the ground mineralization value, and adjust the manual setting with minus or plus. In FMF programs, use GRAB to capture the ground response across the operating frequencies.
Saltwater Beach Settings
Salt Sens
What it does: Reduces responses associated with conductive saltwater in DIVING, BEACH, and BEACH SENS. The range is 1-9, with 9 being most sensitive.
How to change it: Select one of the three saltwater programs, open MENU, find SALT SENS, and adjust with minus or plus.
Recommended approach: If instability follows the wet sand, surf, or changes in coil height, reduce Salt Sens before lowering general sensitivity. Keep the coil parallel and level. Lower Salt Sens may weaken some low-conductive targets around T.ID 30.
If conditions remain difficult: Increase reactivity, and use a frequency scan if electrical interference is also present. In BEACH SENS, reducing Audio Response can make small false signals less prominent.
Magnetic Ground / Black Sand
In the three beach programs, the G.B. menu includes MAGNETIC. REJECT is the default and more stable choice. ACCEPT lets magnetic ground, ferrite, and some otherwise masked deep targets produce a positive response. Treat ACCEPT as an advanced option that requires more interpretation.
Tones and Notch: Controlling What You Hear
Choosing a Tone Mode
What it does: Changes how target information is translated into sound. Two through five tones divide the target range into groups. Full Tones varies pitch with conductivity. Pitch mode varies with signal strength rather than target conductivity.
How to change it: Open MENU > DISCRI > EXPERT, select TONES, and use minus or plus. Where available, select EXPERT again to adjust tone breaks and individual tone volumes.
Recommended starting point: Learn the factory audio for one program using familiar targets. Full Tones provides more information, but switching tone modes constantly makes that information harder to learn.
Notch and Multi-Notch
What it does: Rejects a chosen target-ID window while leaving targets above and below it available. It differs from raising discrimination, which affects the range below a threshold.
How to change it: Open MENU > DISCRI > EXPERT and select NOTCH 1. Adjust the rejected window with minus or plus. Select EXPERT for the Multi-Notch screen, choose a lower or upper tone-break boundary, and adjust it. N2 and N3 provide additional windows.
Use carefully: PARK's factory notch is 23-35; SENSITIVE, SENSI FT, and FAST include a narrow 23-24 window. A rejected number can belong to useful targets as well as trash, so check the existing pattern before assuming the detector is accepting everything.
Threshold
What it does: Sets the background hum when Pitch mode is active. Its level runs from 0-20.
How to change it: With Pitch active, open MENU, select THRESHOLD, and use minus or plus. EXPERT adjusts the threshold tone.
Recommended starting point: Choose a faint, comfortable hum if you want threshold audio. Avoid a loud background that makes subtle changes difficult to hear.
Audio Output, Volume, and Screen Settings
Overall Volume and Audio Output
Overall listening volume is separate from Iron Volume and Audio Response.
How to change it: Open OPTION > AUDIO, select the desired output, and adjust its volume with minus or plus. From the home screen, holding minus or plus for approximately two seconds opens the audio shortcut.
Choose the speaker, compatible XP wireless headphones, BH-01, or wired output as appropriate. A search coil must be paired for the remote to control the wireless-headphone volume. Activate only the outputs you need.
Audio Type, Audio Filter, and Equalizer
Audio Type: Under OPTION > AUDIO, choose the available sound character, such as PWM or Square. This is separate from choosing a tone mode.
Audio Filter: In the same menu, adjust AUDIO FILT. for a smoother sound. The manual suggests lower levels such as 1-2 inland; 0 turns the filter off.
Equalizer: Go to OPTION > AUDIO > EQUALIZER > SELECT to adjust the frequency bands for the chosen output. Use it to make the sound more comfortable and easier to distinguish.
Backlight, Contrast, and Display Profile
Screen settings: Open OPTION > SETTINGS > DISPLAY to adjust backlight, contrast, and brightness. Backlight choices in the manual are OFF, 3s, 10s, 60s, 120s, and ON.
Target display: Open OPTION > SETTINGS > PROFILE to choose the standard, full-screen target-ID, or XY display.
Tip: Start with the standard display so the target and ground information remain easy to compare. Treat XY as another identification clue, not a guaranteed good-target indicator.
Advanced Stereo Multi-Process
The supplied manual also describes MENU > MULTIPROC for stereo processing with WS6ST, WSAST, and WSAXL ST headphones. It can combine channels with different reactivity and audio behavior. It is an optional advanced feature; learn the main program first and check compatibility with your headphones and software before following these controls.
Saving Your Own DEUS II Program
The detector provides 12 user-program slots, numbered 13-24, in addition to factory programs 1-12. Changes to a factory program return to the factory values after switching the remote off and restarting it. Save a useful setup before turning off.

Save and Name a Program
- Adjust the program you want to use as your starting point.
- Open OPTION > PROGRAM > SAVE.
- Select an unused user slot and press SELECT.
- Enter a recognizable name and confirm with VALID.
Rename: OPTION > PROGRAM > EDIT NAME > SELECT, then edit the name and confirm with VALID.
Delete: Select the user program on the main screen, then OPTION > PROGRAM > DELETE > SELECT > YES. Make sure you have selected the intended user slot.
Simple Starting Settings for Common Sites
Use these as starting adjustments to a factory program, then test the response in the ground. They are not complete custom-program recipes or a promise of maximum depth.
| Hunting Situation | Program | Starting Approach |
|---|---|---|
| General land detecting | 1 GENERAL | Keep factory discrimination and audio. Use a stable sensitivity within the manual's common 70-90 range. Reactivity 2-2.5 is a useful general baseline. |
| Parks and modern trash | 5 PARK | Begin with the factory setup, including B.Caps 2. Review the 23-35 notch if small jewelry is a priority. |
| Iron-heavy ground | 4 FAST or 3 SENSI FT | Begin at the factory reactivity of 3. Use stable sensitivity, ground GRAB, and enough Iron Volume to understand the contamination. |
| Cleaner ground and high-conductive targets | 6 DEEP HC | GRAB over clean ground. Consider reactivity 1 where iron is sparse, and use controlled sweeps. Keep Ground Stabilizer conservative while learning. |
| Wet salt sand | 11 BEACH | Keep the coil level. Reduce Salt Sens if salt response is the problem; increase reactivity toward 2.5-3 for difficult black sand or variable salinity. |
| Gold-bearing mineralized ground | 8 GOLD FIELD | GRAB carefully and repeat as conditions change. Reduce sensitivity below instability and increase reactivity when mineralization demands it. |
| Deep, larger relic targets | 9 RELIC | Prioritize accurate GRAB and cautious IAR use. Lower reactivity can help in suitable ground, but this specialist program accepts more ground responses. |
Quick Troubleshooting Guide
| What You Notice | What to Check First |
|---|---|
| Chatter even with the coil stationary | Run a frequency scan, move away from electrical interference, and reduce sensitivity if needed. |
| False signals as the coil approaches inland soil | GRAB over clean ground; check reactivity and Ground Stabilizer where available. |
| Noise in wet salt sand or when lifting the coil | Use a saltwater program, keep the sweep level, and reduce Salt Sens. |
| A good target disappears beside iron | Try higher reactivity and check whether discrimination, notch, or strong Silencer filtering is suppressing it. |
| Every response sounds equally loud | Reduce Audio Response to restore more depth-related volume differences. |
| Settings disappear after restarting | Save the adjusted setup to a user program in slots 13-24. |
Source: XP DEUS II RC user manual supplied for this guide: controls p. 11; programs pp. 12-13; detection settings pp. 14-22; ground pp. 23-25; audio/display pp. 26-30; saved programs p. 31. Illustrations are extracted from that manual and credited to XP Metal Detectors. For the current manual matching your equipment, visit XP's official user-manual library.
Need Help Setting Up Your XP DEUS II?
Metal Detecting Shop is here to help with DEUS II settings, compatible accessories, and choosing a setup for the places you hunt. Give us a call and tell us about your coil, headphones, and ground conditions.
Call 214-888-6598