
Nokta Legend 2 Common Settings: How to Change Them
The Nokta Legend 2 is a powerful, high-performance metal detector with several search modes, audio options, and adjustment settings. This guide explains the most common Legend 2 settings, what they do, and how to change them so you can get better performance in parks, fields, beaches, relic sites, and goldfields.
The Legend 2 gives you two main areas for adjustments: Quick Settings and the regular Settings Menu. Quick Settings are the ones you will use most often while detecting, such as sensitivity, frequency, discrimination, recovery speed, bottle cap rejection, iron filter, and beach stability. The regular Settings Menu controls items like volume, frequency shift, ground suppressor, backlight, vibration, flashlight, notch, and audio output.
Legend 2 Button Layout
Before changing settings, it helps to know what each button does. Most adjustments are made with the Power / Settings button, Quick Settings button, Right and Left buttons, and the Up and Down buttons.

Nokta Legend 2 control buttons and keypad layout.
Basic Button Guide
Power / Settings Button: Hold for about 2 seconds to turn the detector on or off. Press once to enter or exit the Settings Menu.
Right Button: Changes search modes on the main screen. In menus, it moves through settings.
Left Button: Changes user profiles on the main screen. In menus, it moves through settings.
Up / Down Buttons: Adjust the selected setting value.
Ground Balance Button: Press once to enter ground balance. Press and hold to perform automatic ground balance.
Pinpoint / Accept-Reject Button: Press once to pinpoint a target. It is also used to accept or reject target IDs in notch settings.
Quick Settings / Mute Button: Press once to open Quick Settings. Press and hold to mute or unmute the detector.
Understanding the Display
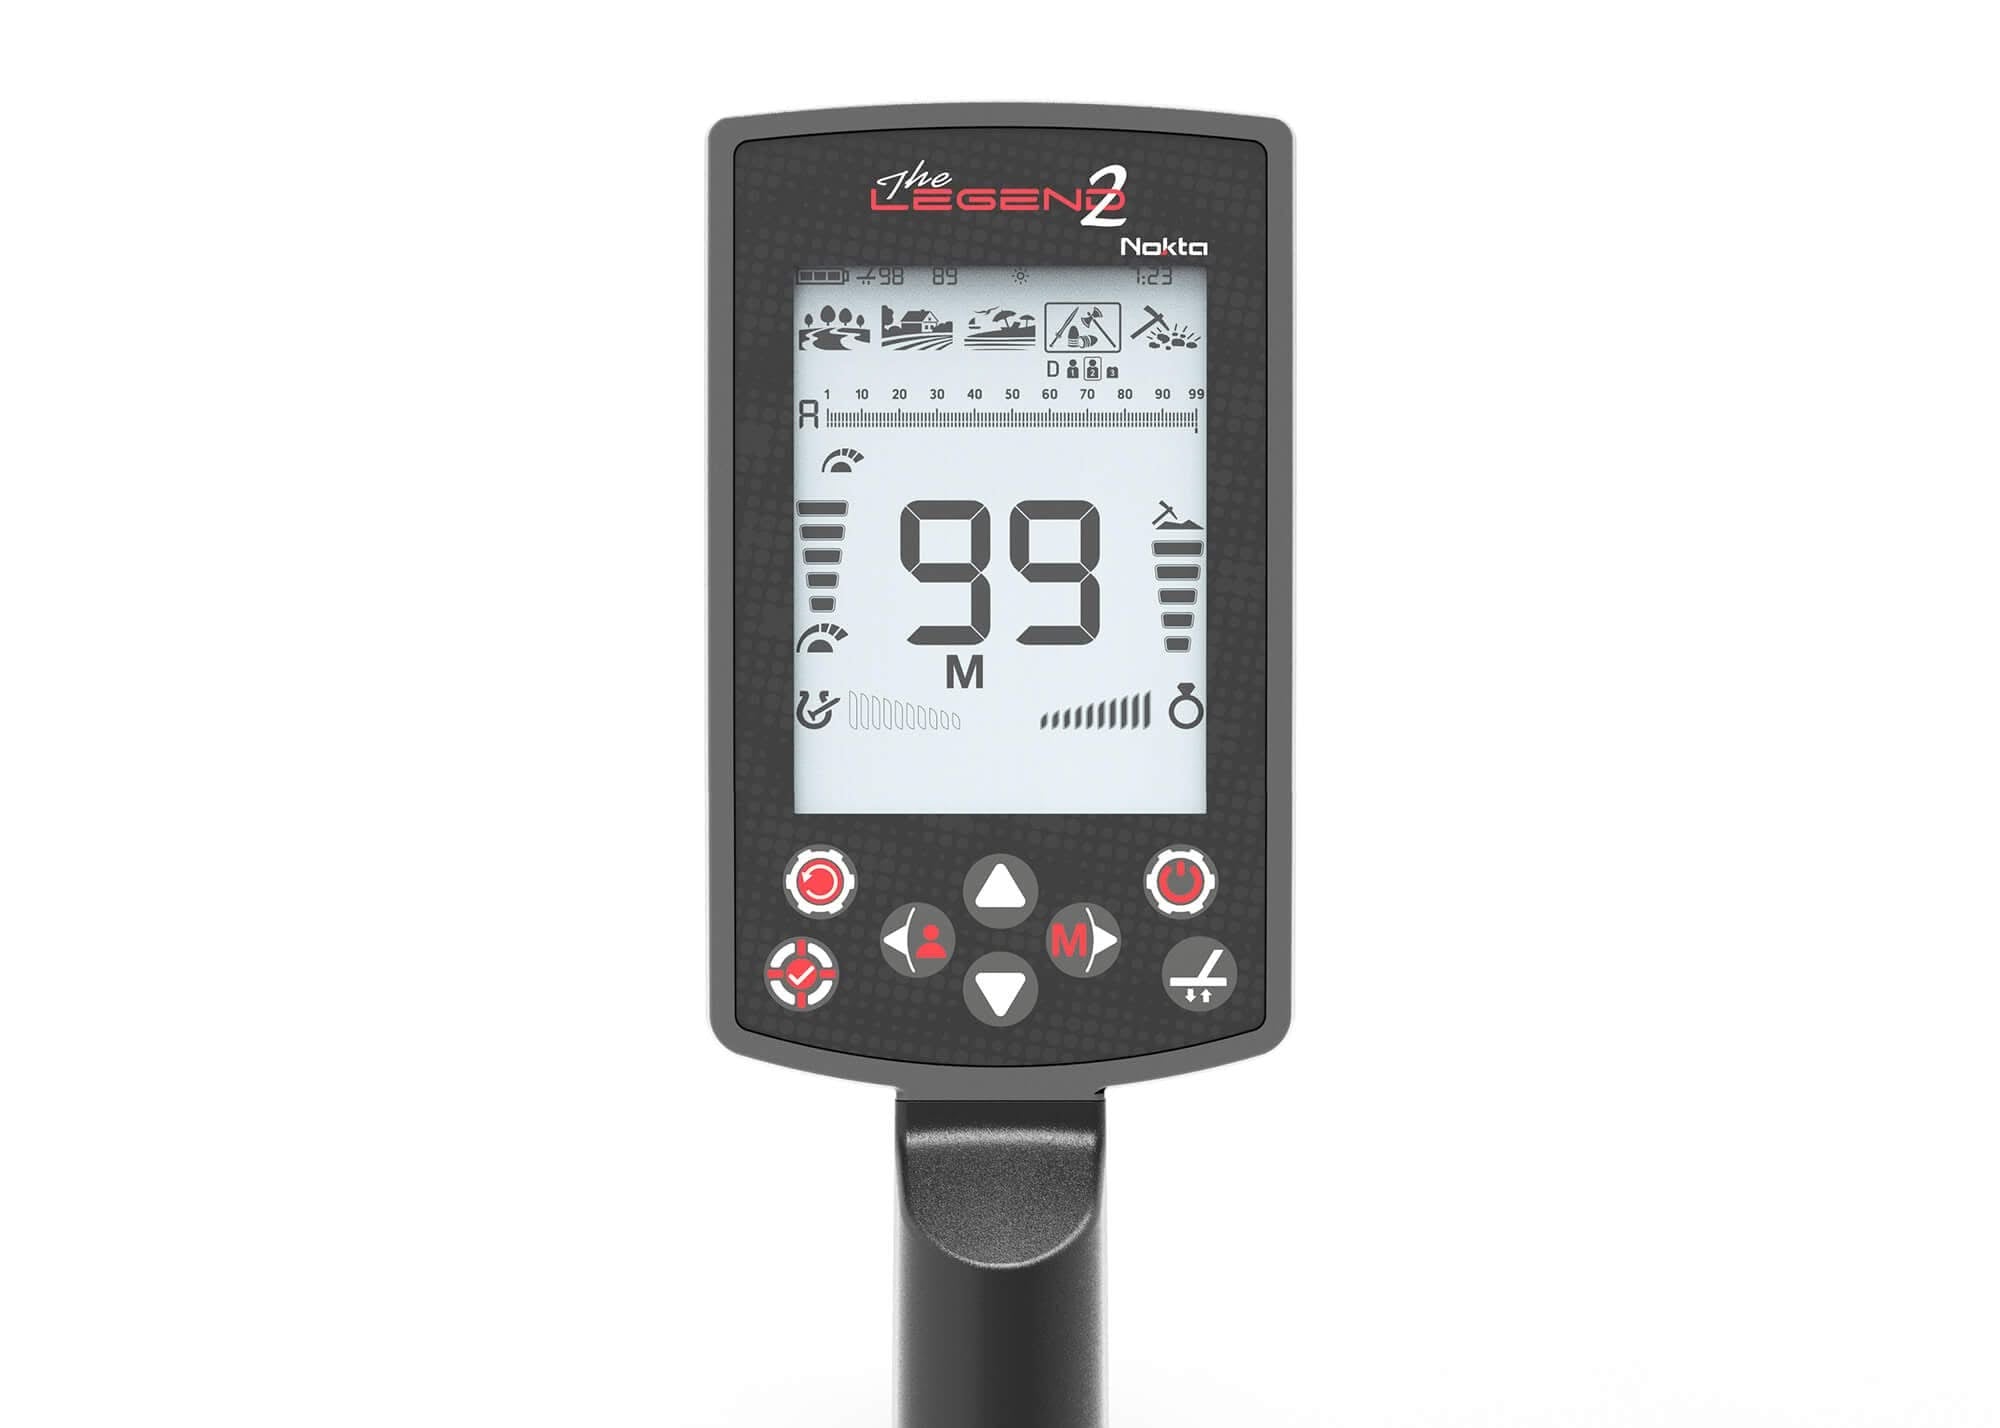
The Legend 2 display shows your search mode, target ID scale, discrimination pattern, quick settings, sensitivity level, operating frequency, FerroCheck bar, user profile, target ID, depth indicator, and audio options. Learning where these icons are will make changing settings much easier in the field.

Legend 2 display overview showing the search modes, target ID scale, quick settings, depth indicator, and audio icons.
Before Changing Settings: Get the Basics Right
Before making major adjustments, make sure the shaft height and sweep technique are correct. Poor coil control can cause missed targets, false signals, and inconsistent target IDs. Keep the coil level and parallel to the ground through the entire swing.

Correct shaft height and coil sweep technique are important for accurate target response.
Choosing the Right Search Mode
The Legend 2 has five search modes designed for different terrain and target types. You can change search modes from the main screen by pressing the Right button.
Park Mode
Best for coin and jewelry hunting in parks, yards, and urban areas with modern trash such as foil, pull tabs, and bottle caps.
Field Mode
Best for coin and relic hunting in pastures, farm fields, and plowed ground where iron debris and coke fragments may be present.
Beach Mode
Best for dry sand, wet salt sand, and underwater use. Beach Mode uses multi-frequency only and has options for wet sand/underwater and dry low-salinity sand.
Relic Mode
Best for deeper relic-style targets and larger masses. Ground balancing is very important in Relic Mode.
Gold Mode
Best for mineralized goldfields and small gold nuggets. Gold Mode uses higher single frequencies and Multi frequency.
How to Open Quick Settings
Quick Settings are the adjustments most users will change while detecting. To open Quick Settings, press the Quick Settings / Mute button, Up button, or Down button once. Use the Right and Left buttons to move between quick settings, then use the Up and Down buttons to change the value. Press the Quick Settings / Mute button again to exit.

The Legend 2 Quick Settings menu includes sensitivity, frequency, discrimination, recovery speed, bottle cap rejection, iron filter, and beach stability.
1. Sensitivity
What it does: Sensitivity controls how strongly the detector responds to targets and ground signals. Higher sensitivity can increase depth, but it can also make the detector noisy in bad ground or high EMI areas.
When to adjust it: Raise sensitivity when the detector is stable. Lower it if the detector is chattering, popping, falsing, or reacting too much to the ground.
How to change it:
Open Quick Settings, select the Sensitivity icon, then use the Up or Down buttons to increase or decrease the value. Press Quick Settings again to exit.
Recommended starting point: Start around 25. If the detector runs smooth, try increasing it. If it becomes unstable, lower it until it quiets down.
2. Frequency
What it does: Frequency changes how the detector responds to different targets and ground conditions. The Legend 2 offers simultaneous Multi frequency plus several single-frequency options.
Best general choice: Use Multi frequency for most detecting. It is usually the best all-around choice for depth, target ID accuracy, and different target types.

Legend 2 frequency options vary by search mode.
How to change it:
Open Quick Settings, select Frequency, then use the Up and Down buttons to switch between available frequency choices. Press Quick Settings again to exit.
| Frequency Choice | Good For |
|---|---|
| Multi | Best all-around choice for most park, field, beach, and general hunting. |
| 4 kHz | Larger, higher-conductive targets such as larger silver and copper coins. |
| 20 kHz / 40 kHz | Smaller low-conductive targets, thin jewelry, and small gold-type targets. |
| Beach MW / MD | MW is for wet sand, underwater, or higher salinity. MD is for dry sand with very low salinity. |
3. Discrimination Patterns
What it does: Discrimination controls which target IDs the detector accepts or rejects. This helps reduce unwanted iron, ground response, or specific trash targets.
The Legend 2 includes different discrimination patterns such as All Metal, Ground Off, Ferrous Off, and Custom. Park, Field, and Beach default to Ferrous Off. Relic defaults to All Metal. Gold defaults to Ground Off.
How to change it:
Open Quick Settings, select the Discrimination Pattern setting, then use the Up and Down buttons to switch patterns. Press Quick Settings again to exit.
Recommended starting point: Use Ferrous Off for most park and field coin hunting. Use All Metal when you want to hear everything or when checking a site more carefully.
4. Recovery Speed
What it does: Recovery Speed controls how fast the detector responds and resets between nearby targets. A higher setting helps separate targets in trash. A lower setting can improve depth in cleaner ground, but nearby targets may blend together.
How to change it:
Open Quick Settings, select Recovery Speed, then use the Up and Down buttons to adjust the value. Press Quick Settings again to exit.
| Situation | Suggested Adjustment |
|---|---|
| Trashy park or iron-heavy site | Increase Recovery Speed for better separation. |
| Cleaner field or open ground | Lower Recovery Speed slightly for more depth. |
| General starting point | Use the factory default: Park 5, Field 5, Beach 6, Relic 5, Gold 5. |
5. Bottle Cap Rejection
What it does: Bottle Cap Rejection helps identify some steel bottle caps as iron instead of letting them sound like good non-ferrous targets.
This setting works in Multi frequency and can be adjusted from 0 to 8. A setting of 0 turns the feature off.
How to change it:
Open Quick Settings, select Bottle Cap Rejection, then use the Up and Down buttons to adjust the value. Press Quick Settings again to exit.
Recommended starting point: Leave it at 0 unless bottle caps are becoming a problem. Increase gradually only as needed.
6. Iron Filter
What it does: Iron Filter helps in trashy sites where non-ferrous targets may be masked by iron. It operates in Multi frequency and can be adjusted from 1 to 9.
The factory defaults are Park 3, Field 3, Beach 1, and Gold 3. Iron Filter is not available in Relic Mode.
How to change it:
While using Multi frequency, open Quick Settings, select Iron Filter, then use the Up and Down buttons to change the value. Press Quick Settings again to exit.
Recommended starting point: Use the factory default unless the site is very iron-heavy. Test targets in the ground before making big changes.
7. Beach Stability
What it does: Stability in Beach Mode reduces ground noise and false signals on salty beaches. It can be adjusted from 1 to 5, with 5 being the default.
Important: Higher stability can make the detector run smoother, but it may reduce response on some lower-conductive targets such as small gold around the 21 ID range.
How to change it:
Select Beach Mode, open Quick Settings, select Stability, then use the Up and Down buttons to adjust it. Press Quick Settings again to exit.
Recommended starting point: Start at 5. If the detector is still unstable, test 4 as well, because in some beach conditions level 4 may run better than level 5.
Ground Balance
The Legend 2 is designed to work without ground balancing in many conditions, but ground balance can improve depth and stability in mineralized soil, relic sites, goldfields, and difficult beach conditions.
Automatic Ground Balance
When to use it: Use automatic ground balance when the ground is mineralized, the detector is unstable, or you are hunting in Relic or Gold Mode.
How to do it:
Find a clean spot with no metal. Press and hold the Ground Balance button. While holding it, pump the coil smoothly from about 6-8 inches above the ground down to about 1 inch above the ground. Keep the coil parallel. Continue until the ground response reduces and the ground balance value stabilizes.
Manual Ground Balance
When to use it: Use manual ground balance when automatic ground balance does not settle correctly or you need a small correction.
How to do it:
Press the Ground Balance button once. Pump the coil up and down over clean ground. If you hear a low tone, increase the ground balance value with the Up button. If you hear a high tone, lower the value with the Down button. Press Ground Balance again to exit.
Ground Tracking
When to use it: Ground Tracking is helpful where ground conditions change across the site. It automatically updates ground balance as you sweep.
How to turn it on:
Press the Ground Balance button once to enter the ground balance screen. Press the Pinpoint / Accept-Reject button once to activate tracking. Press Ground Balance again to return to the main screen.
Tip: Do not automatically use tracking everywhere. In heavy hot rock areas, tracking can sometimes work against you or reduce response on smaller/deeper targets.
Notch: Accepting and Rejecting Target IDs
Notch lets you accept or reject individual target IDs from 1 to 99. This is useful when you want to silence a specific trash target. Use this carefully because rejecting too many IDs can also reject good targets.

Legend 2 Notch setting for accepting or rejecting specific target IDs.
Manual Notch
How to change it:
Press the Power / Settings button once. Use the Right and Left buttons to select Notch. Move the cursor using the Up and Down buttons until you reach the target ID you want to accept or reject. Press the Pinpoint / Accept-Reject button to toggle that ID on or off.
Automatic Notch
How to use it:
Enter the Notch setting, then sweep the coil over the object you want to reject. When the target ID appears, press the Pinpoint / Accept-Reject button to accept or reject that ID.
Best use: Automatic notch is useful when you have a known trash item at the site and want to reject that specific response.
Regular Settings Menu
Press the Power / Settings button once to open the regular Settings Menu. Use the Right and Left buttons to move through settings and the Up and Down buttons to change values.
Volume
What it does: Adjusts the detector’s overall volume. The default volume is 7.
How to change it:
Press Power / Settings once, select Volume, then use Up or Down to adjust. Press Power / Settings again to exit.
Tip: Do not run the volume higher than needed because higher volume can use more battery.
Frequency Shift / Noise Cancel
What it does: Helps reduce electromagnetic interference from power lines, other detectors, cell towers, wireless devices, and other electrical sources.
How to use automatic frequency shift:
Hold the coil still and away from the ground. Press Power / Settings once, select Frequency Shift, then press the Pinpoint / Accept-Reject button once. The detector will scan channels and choose a quieter one.
Tip: Try frequency shift before lowering sensitivity. This can help keep depth while reducing chatter.
Ground Suppressor
What it does: Helps reduce false ground signals in difficult terrain. It can be adjusted from 0 to 8, with 0 being off.
How to change it:
Press Power / Settings once, select Ground Suppressor, then use Up or Down to adjust the value.
Recommended starting point: Leave it off unless the ground is causing false signals that cannot be handled with ground balance or sensitivity.
Deep Target Identification
What it does: Helps deep non-ferrous targets that may be masked or read as iron report more correctly as non-ferrous. It can be adjusted from 1 to 3, and the default is 3.
How to change it:
Press Power / Settings once, select Deep Target Identification, then use Up or Down to adjust.
Backlight
What it does: Adjusts the screen and keypad backlight. The screen backlight ranges from 0 to 5 and A1 to A5. The A settings turn the backlight on briefly when a target is detected or when navigating the menu.
How to change it:
Press Power / Settings once, select Backlight, then use Up or Down to adjust. When the Backlight setting is selected, press the Pinpoint / Accept-Reject button to turn the keypad backlight on or off.
Tip: Use auto backlight settings to save battery.
Vibration
What it does: Adds vibration feedback when a target is detected. It can be used with audio or by itself.
How to change it:
Press Power / Settings once, select Vibration, then use Up or Down to turn it on or off.
LED Flashlight
What it does: Turns on the built-in LED flashlight for night hunting or low-light conditions.
How to change it:
Press Power / Settings once, select LED Flashlight, then use Up or Down to turn it on or off.
Tip: The flashlight uses battery, so turn it on only when needed.
Bluetooth Headphones and Audio Output
The Legend 2 can use the built-in speaker, bone conduction headphones, Bluetooth headphones, multiple audio output, or wired headphones with the proper adapter.
Pairing Bluetooth Headphones
How to change audio output:
Press Power / Settings once and select Audio Options. Use Up and Down to choose the Bluetooth option. The Bluetooth icon will blink while the detector is in pairing mode.
Deleting paired headphones: In the Bluetooth setting, press and hold the Pinpoint / Accept-Reject button. The detector will display “Fd” and clear the previously paired headphone list.
User Profiles
User Profiles let you save preferred settings for different sites and targets. The Legend 2 offers three user profiles in each search mode, giving you multiple saved setups across Park, Field, Beach, Relic, and Gold.
Saving a User Profile
How to save:
On the main screen, press the Left button to choose a user profile. Then press and hold the Left button for about 2.5 seconds to save your settings to that profile.
Clearing a User Profile
How to clear:
Select the saved profile, then press and hold the Left button for about 5 seconds. The detector will clear the saved profile.
Simple Starting Settings for Most Users
| Hunting Situation | Mode | Suggested Starting Settings |
|---|---|---|
| Parks and modern trash | Park | Multi frequency, Sensitivity around 25, Recovery Speed 5, Ferrous Off discrimination. |
| Fields and old home sites | Field | Multi frequency, Sensitivity as high as stable, Recovery Speed 5, ground balance if needed. |
| Wet salt beach | Beach | MW multi-frequency, Recovery Speed 6, Stability 5 or test 4, ground balance if needed. |
| Deep relic hunting | Relic | Ground balance first, use All Metal, Recovery Speed 5, dig more questionable deep signals. |
| Goldfields | Gold | 20 kHz, 40 kHz, or Multi depending on the ground, threshold adjusted so faint changes can be heard. |
Need Help Choosing or Setting Up a Nokta Legend 2?
Metal Detecting Shop is here to help you get the right detector and understand how to use it. If you have questions about the Nokta Legend 2, settings, accessories, or choosing the right package, give us a call.
Call 214-888-6598```